Gluten Free Pizza Crust
Crisp golden edges, a soft center, and enough structure to actually hold your toppings — no dry, crumbly disappointment. A recipe built around getting the hydration right.
Finding the perfect gluten free pizza crust recipe can feel frustrating. Many gluten-free pizza crusts turn out dry, crumbly, dense, or simply lacking the chewy texture people expect from great homemade pizza.
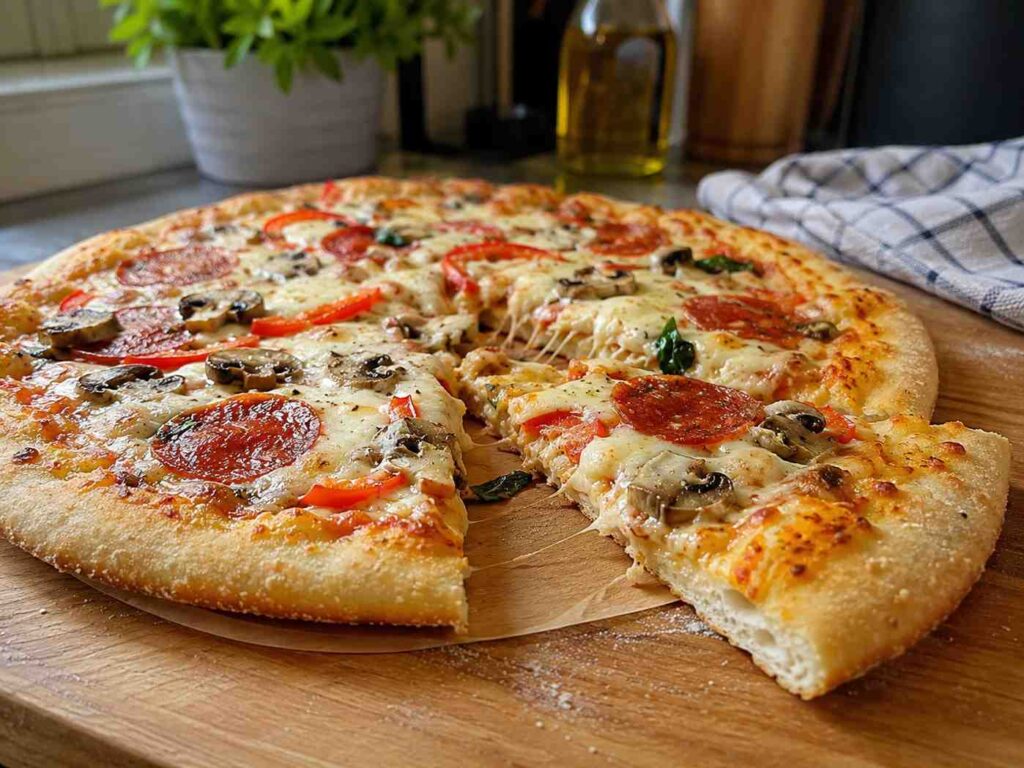
The good news is that this recipe solves those problems. It creates a crust that bakes beautifully with crisp golden edges, a soft center, and enough structure to hold your favorite toppings without falling apart.
Whether you follow a gluten-free diet because of celiac disease, gluten sensitivity, or personal preference, this recipe delivers reliable results with simple ingredients and easy-to-follow steps.
Common gluten-free pizza problems
One common issue is a crust that turns dry and crumbly after baking.
Additionally, many recipes create dough that feels too dense and heavy instead of light and enjoyable.
Another problem is weak structure, which causes the crust to break apart under sauce and toppings.
Fortunately, this recipe avoids all of these problems by focusing on proper hydration and balanced ingredients.
Quick recipe info
| Detail | Value |
|---|---|
| ⏱️ Prep Time | 20 Min |
| ⏳ Rest Time | 20–30 Min |
| 🔥 Baking Time | 18–22 Min |
| 🍽️ Yield | 1 Large Pizza |
| 👨🍳 Difficulty | Easy |
Ingredients you’ll need
- 300 g gluten-free flour blend
- 1 tsp xanthan gum (if blend doesn’t include it)
- 7 g instant yeast
- 1 tsp sugar
- 1 tsp salt
- 2 tbsp olive oil
- 250 ml warm water
- 1 tsp baking powder
Why this recipe works
First, the gluten-free flour blend creates structure while xanthan gum helps mimic elasticity.
Additionally, olive oil improves texture and prevents dryness during baking.
Most importantly, proper hydration keeps the crust soft inside while allowing crisp edges to develop.
The full recipe
Here’s everything condensed into one printable card — check off ingredients as you go, and follow the numbered steps in order.
Gluten Free Pizza Crust
Yield: 1 large pizza · Prep 20 min · Rest 20-30 min · Bake 18-22 min
Ingredients
Method
- Activate the yeast. Stir sugar and yeast into the warm water and let rest 5-10 minutes until slightly foamy.
- Mix the dry ingredients. Whisk together the flour blend, xanthan gum, baking powder and salt.
- Form the dough. Add olive oil to the yeast mixture, then gradually mix in the dry ingredients until soft and sticky.
- Rest the dough. Cover and let rest in a warm place for 20-30 minutes.
- Shape the crust. Spread onto a lined tray into a round shape 0.5-1 cm thick, with slightly thicker edges.
- Pre-bake. Bake at 220°C (425°F) for 8-10 minutes until lightly set.
- Add sauce and toppings. Spread sauce, add cheese and toppings without overloading the crust.
- Final bake. Bake another 10-12 minutes until the cheese melts and the edges turn golden and crisp.
- Rest and serve. Let sit 2-3 minutes before slicing and serving warm.
Step-by-step instructions
Step 1: Activate the yeast
First, pour the warm water into a large mixing bowl.
Next, add the sugar and instant yeast, then stir gently until combined.
Let the mixture rest for 5–10 minutes until slightly foamy.
This step helps ensure the yeast is active and ready to create a lighter crust.
Step 2: Combine the dry ingredients
Meanwhile, in a separate bowl, whisk together the gluten-free flour blend, xanthan gum, baking powder, and salt.
Mix thoroughly so all ingredients are evenly distributed.
This helps improve consistency throughout the dough.
Step 3: Form the dough
Once the yeast mixture is ready, add olive oil.
Gradually add the dry ingredients into the bowl while mixing continuously.
The dough will look softer and stickier than traditional pizza dough, which is completely normal.
Avoid adding too much extra flour, as this can make the crust dry after baking.
Step 4: Let the dough rest
Cover the bowl with a clean kitchen towel or plastic wrap.
Allow the dough to rest for 20–30 minutes in a warm place.
During this time, the flour absorbs moisture while the yeast begins developing structure and airiness.
Step 5: Shape the pizza crust
Line a pizza tray or baking sheet with parchment paper.
Transfer the dough onto the prepared surface.
Using lightly oiled hands or a spatula, gently spread the dough into a round pizza shape about 0.5–1 cm thick.
Try to make the edges slightly thicker to create a better crust.
Step 6: Pre-bake the crust
Meanwhile, preheat your oven to 220°C (425°F).
Place the shaped crust into the oven and pre-bake for 8–10 minutes.
This step is important because gluten-free crust benefits from partial baking before adding toppings.
The surface should look slightly set and lightly firm.
Step 7: Add sauce and toppings
Remove the crust carefully from the oven.
Spread pizza sauce evenly across the surface, leaving a small border around the edges.
Next, add cheese and your favorite toppings.
Avoid overloading the pizza, as too many toppings can make the crust soggy.
Step 8: Final bake
Return the pizza to the oven and bake for another 10–12 minutes.
Bake until the cheese melts completely and the crust edges become golden and slightly crisp.
For extra crispiness, you can bake for 1–2 additional minutes while watching closely.
Step 9: Cool and serve
Remove the pizza from the oven and let it rest for 2–3 minutes.
This short resting time makes slicing easier and helps the toppings settle.
Finally, slice and serve while warm.
Best topping ideas
Classic toppings like mozzarella, pepperoni, mushrooms, and olives work beautifully on this crust.
Additionally, vegetables such as bell peppers, onions, spinach, and cherry tomatoes add freshness and color.
For extra flavor, consider adding fresh basil, feta cheese, or chili flakes after baking.
Storage tips
Store leftover pizza in an airtight container in the refrigerator for up to 3 days.
For longer storage, freeze slices individually for up to 2 months.
Reheat in the oven or air fryer for the best texture.
Frequently asked questions
Can I make this dough ahead of time?
Yes. You can prepare the dough several hours in advance and keep it covered in the refrigerator.
Do I need xanthan gum?
Only if your gluten-free flour blend does not already include it.
Can I make this crust dairy-free too?
Absolutely. Simply use dairy-free cheese and toppings of your choice.
Why everyone loves this gluten free pizza crust
People love this recipe because it delivers a crust that feels much closer to traditional pizza than many gluten-free alternatives.
Additionally, it creates a satisfying balance between crispy edges and a soft center.
Most importantly, this recipe is simple, reliable, and easy enough for both beginners and experienced home cooks.